

Hair transplant examples for a natural-looking professional image

A hair transplant can support your professional image when the hairline suits your features and the transplanted hairs follow natural growth patterns. The crown needs careful placement too, so coverage looks balanced rather than uniform. Newly planted hair follicles fall out after transplantation while their roots remain, and new hair typically takes 12-18 months to grow to a normal length.
It’s understandable to want a result that looks like you, not like a procedure. At work, in meetings or on camera, a convincing outcome is about more than adding density: the hairline, crown coverage, growth pattern and any visible scarring all matter.
This article explains what to look for in hairline and crown examples, and how to compare before-and-after photographs fairly. You’ll also learn about the growth timeline, why some scarring can occur and how natural-looking placement is planned around your hair and head shape. The aim is to help you assess results clearly, rather than rely on a dramatic photograph or a promised outcome.
Table of Contents
Crown and hairline transplant results
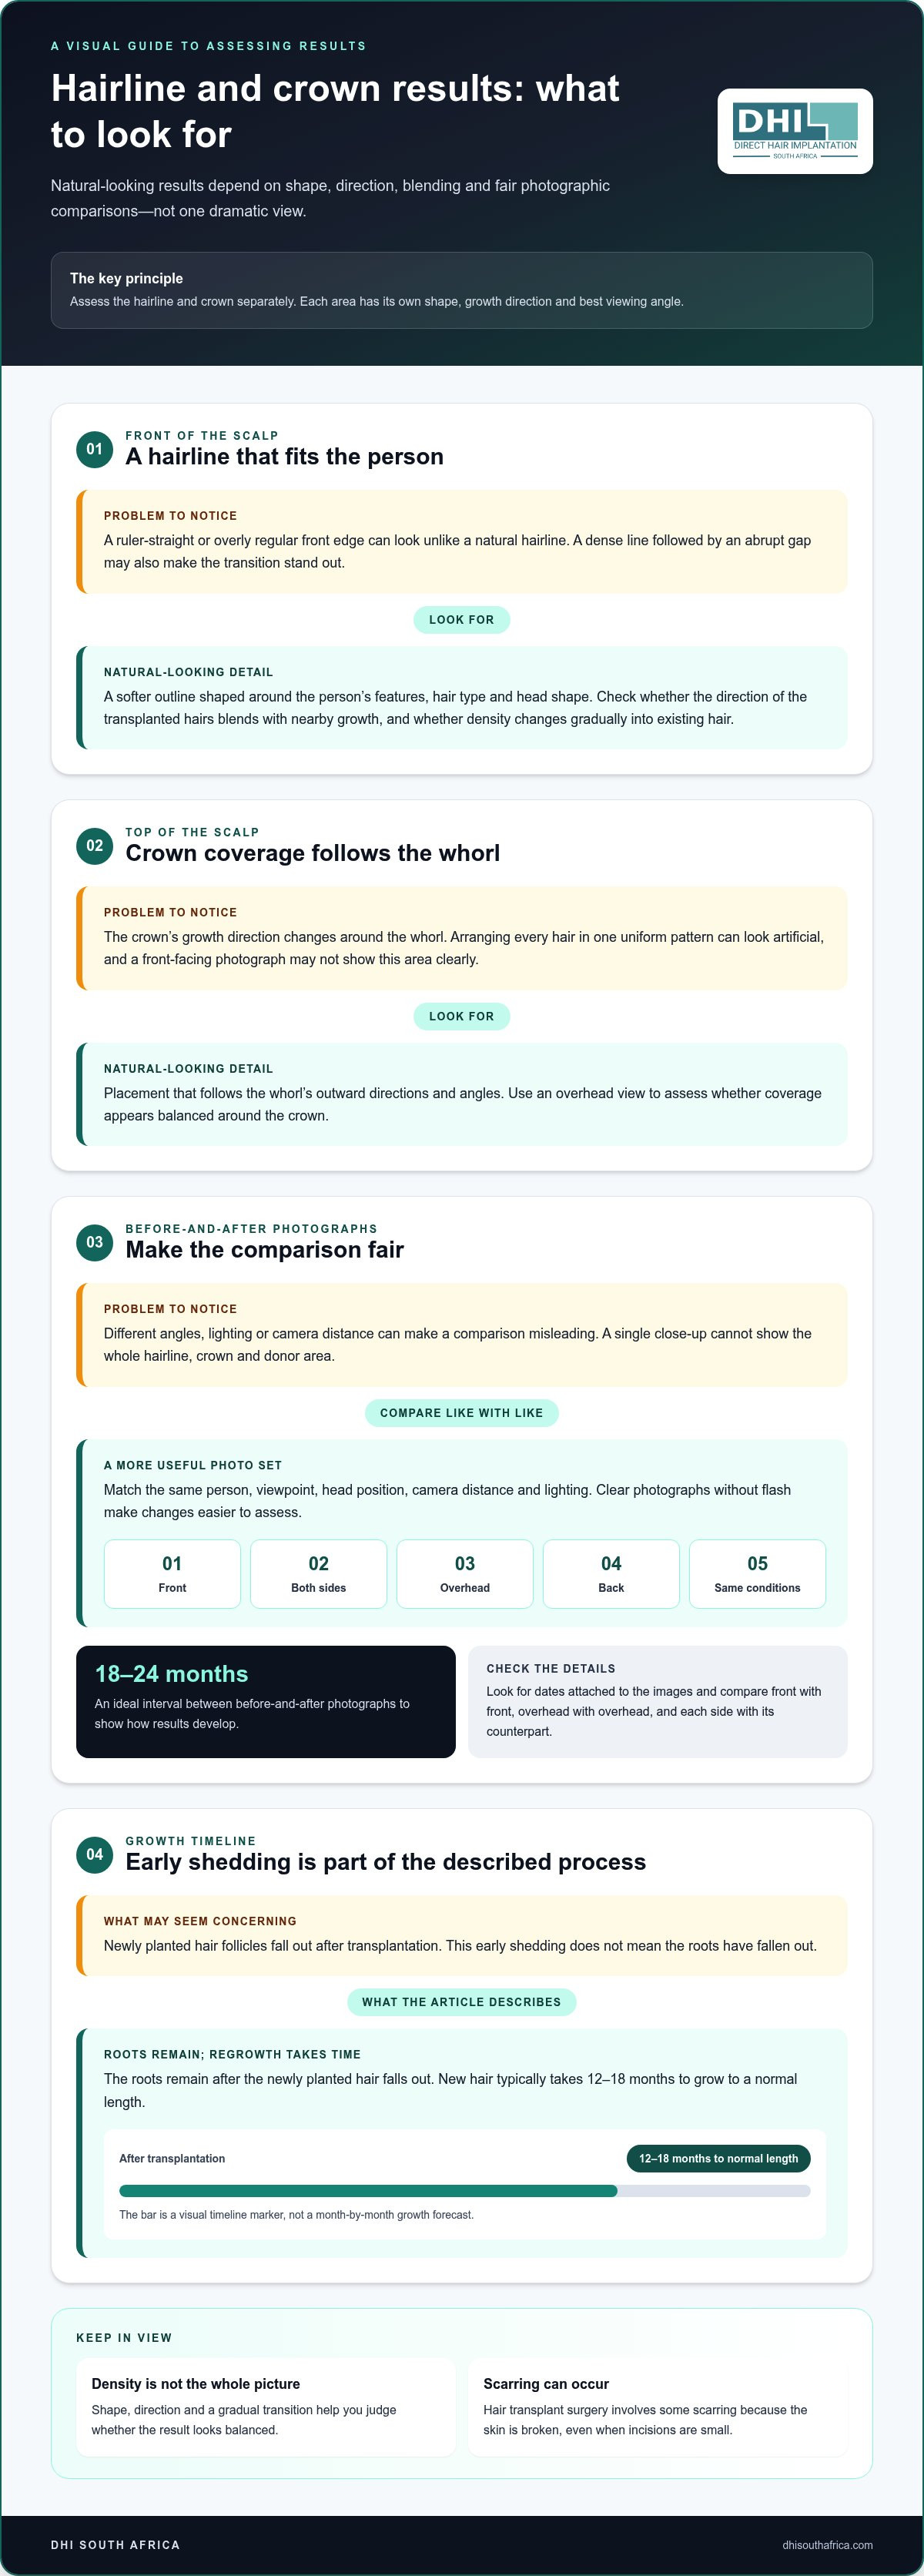
A natural-looking result involves more than filling a visible gap. The hairline frames the face, while the crown's changing growth directions make placement more complex. Assess these areas separately in photographs. A convincing front view does not automatically show the crown from above or how the hairline looks from the side.
Example, receding hairline: The concern is a high or uneven front edge that differs from the person's earlier hairline. Planning shapes a softer outline around their features, hair type and head. The aim is a transition that blends with existing hair, rather than a straight line across the forehead.
Example, thinning crown: The concern is reduced coverage around the whorl, where hair changes direction. Placement follows those directions and angles instead of arranging every hair in one uniform pattern. The aim is more even-looking coverage from above. An overhead photograph can help you assess whether density appears balanced around the whorl.
Density matters, but a packed appearance can undermine naturalness. Hair transplant photos should show a natural-looking hairline with good density, not an artificially regular border. Look closely at the transition from the front edge into existing hair. A gradual change in spacing can look more believable than a dense line followed by an abrupt gap.
Angle is another detail to examine. Transplanted hairs need different angles to create the appearance of natural growth and fuller coverage. At the hairline, direction should blend with nearby hairs. At the crown, placement should follow the whorl's outward pattern. A front view may conceal the crown's direction, so consider both areas from suitable viewpoints.
If you are considering a hair transplant for a professional image, review each feature in context. Use these practical steps:
Check the outline: Look for a hairline shaped to the individual, not a ruler-straight edge.
Follow the direction: Compare transplanted hairs with neighbouring growth at the front and crown.
Assess the transition: Notice whether density blends gradually into surrounding hair.
Change the viewpoint: Consider the front, sides and overhead view separately.
These details can influence how a hair transplant looks in professional settings, especially under bright office lighting or on video calls. For South African readers considering the procedure, hair transplant treatment in South Africa is a relevant topic to explore. Focus on how the hairline, crown direction and surrounding density work together, rather than judging a result from one angle alone.
When planning a procedure, careful customisation is essential. A straight hairline would look unnatural, so specialists recreate a natural-looking hairline to suit the individual's unique needs, hair type and head shape.
Before-and-after slider galleries
A slider can make a change easy to spot, but the comparison is only useful when both photographs are fair. Check that the images show the same person at similar angles and in comparable lighting. A bright flash can flatten texture and create glare, while poor lighting can hide thinning. Clear photographs without flash make changes easier to assess.
A detailed gallery should show the head from the front, both sides, overhead and the back. Each view answers a different question. The front shows the hairline; side views reveal how it blends into existing hair; an overhead view shows crown coverage; and the back records the donor area. One close-up alone cannot provide this context.
Photographs are preferably taken by a trained hair transplant surgeon using professional photographic equipment. Consistent framing helps you compare the same area instead of mistaking a change in camera distance for a change in density. Look for matching head position, background and camera height across the before-and-after pair.
Example, frontal thinning: The concern is a receding hairline visible in the original front photograph. Compare it with a later front view taken from a similar distance and angle. You can then assess whether the outline appears changed and blends with nearby hair. A slider that shifts between unrelated angles cannot show this clearly.
Example, crown thinning: The concern is reduced coverage at the crown in an overhead photograph. Compare it with a later overhead view under similar lighting, then review the back and sides for context. This gives you a more complete view of coverage than a front-facing image that does not show the crown.
Timing matters. Before-and-after hair transplant photographs are ideally taken 18-24 months apart. This interval gives a longer view of how the result develops than an early comparison. Check the dates attached to each image, and distinguish a later outcome photograph from one taken during an earlier stage.
Use this gallery checklist:
Match the views: Compare front with front, overhead with overhead, and each side with its counterpart.
Review the conditions: Look for clear lighting without flash and similar camera distance.
Check the timeframe: Note whether the photographs are 18-24 months apart.
Read the whole set: Use several angles, including the back, rather than relying on one flattering frame.
For further examples, browse the hair transplant results gallery and assess each case using the same photographic details.
How long transplanted hair takes to grow
After transplantation, newly planted hair follicles fall out whilst their roots remain. New hair typically takes 12-18 months to grow to a normal length. Early shedding is therefore different from the later growth stage. Track changes over time rather than judging the outcome from the first weeks.
Example, early shedding: The situation is that transplanted hairs have fallen out. The key detail is that their roots remain, and new growth takes 12-18 months to reach normal length. Keeping that distinction in mind can make changes easier to interpret as growth develops.
If professional appearance is part of your reason for considering hair restoration, think about how the growth period fits around important work commitments. The 12-18-month timeframe describes typical growth to normal length, not a guaranteed date for a particular appearance. This distinction can help you plan without expecting an immediate change.
How can I compare hair transplant clinics in South Africa? Compare the clarity of each proposed plan, the photographic records available and explanations of growth and scarring. Ask how the assessment considers your hairline, crown and donor area. A useful comparison focuses on the reasoning behind the plan, rather than a single photograph.
What alternatives to hair transplant surgery can help with hair loss? Medical hair-loss treatments and non-surgical options, such as scalp micropigmentation or hair systems, may suit different needs. The choice depends on your hair-loss pattern and the appearance you want. Discuss the difference between restoring hair and creating the appearance of greater coverage.
Who is a good candidate for a hair transplant? Suitability depends on the cause and pattern of hair loss, available donor hair, general health and expectations. These factors shape whether a transplant can address the areas that concern you. A considered assessment accounts for the planned design and your longer-term hair-loss pattern.
What are the risks and side effects of hair transplant surgery? Surgery breaks the skin, so some scarring occurs, however small the incision. Newly planted hairs also fall out whilst their roots remain. Ask how the proposed approach may affect visible marks and what aftercare applies to your procedure.
What qualifications and credentials should a South African hair transplant surgeon have? Ask about the surgeon’s medical qualifications and specific training in hair-restoration procedures. Clarify who plans and performs each stage, and what experience the surgeon has with the approach being discussed. These questions help you understand the practitioner’s role and background without relying on a clinic’s general description.
What questions should I ask during a hair transplant consultation? Ask how your hair-loss pattern and donor area shape the plan, what growth timeline to expect, and how scarring is considered. Explain where appearance matters to you, such as meetings or video calls. This gives the consultation a practical focus and helps you discuss your priorities clearly.
Minimising visible scarring
Hair transplant surgery involves some scarring because breaking the skin causes marks, however small the incision. The realistic aim is to reduce how noticeable they are, not to claim that surgery leaves no trace. For a professional image, consider scar visibility alongside hairline shape, crown coverage and the way you usually wear your hair.
Start by asking where incisions will be made and how the planned approach affects the donor and recipient areas. Location matters because surrounding hair covers marks differently in different areas. The size and distribution of incisions also affect the pattern you can see. A clear explanation helps you understand which areas to examine in photographs and consider in everyday styling.
Hair length changes what is visible. A closely cropped style exposes more scalp than longer hair, which can cover marks around the donor area. This does not remove scarring; it changes how much of the scalp is visible. Consider your usual cut, including how short you wear the sides and back, when discussing the appearance you want.
Example, short hairstyle: The concern is a person who keeps the back and sides closely cropped. Discuss how the donor area could look with that specific hairstyle. This makes the conversation about visible marks more relevant than relying only on examples with longer hair.
Example, longer hairstyle: The concern is a person who wears enough length to cover parts of the donor area. Review the intended incision locations and how surrounding hair sits over the area. This clarifies how hairstyle and scar location interact, without mistaking coverage for scar-free skin.
Use these practical steps when reviewing a proposed plan:
Identify the areas: Ask which parts of the scalp will have incisions.
Match your hairstyle: Explain whether you wear your hair cropped, short or longer.
Review comparable examples: Look for photographs showing the donor area and similar hair length.
Separate coverage from healing: Hair can conceal marks, but it does not erase them.
Lighting and camera angle also affect how clearly a mark appears in a photograph. Compare images taken from similar viewpoints, and examine the donor area rather than relying solely on a front-facing result. A photograph showing only the hairline cannot answer questions about marks elsewhere on the scalp.
During a consultation, ask how the planned incision locations relate to your preferred hairstyle and which areas will be visible from the front, sides and back. These details help you weigh scar visibility against your desired coverage. A careful discussion should explain the trade-offs plainly, including the fact that even small incisions leave some scarring.
Natural-looking transplant results
A natural result reflects how hair grows, rather than creating a uniform block of coverage. Naturally growing hair appears in groupings of one, two, three or four hair follicles. A convincing pattern respects these groupings, placing smaller units where a soft transition matters and varied groupings through areas needing coverage.
Example, the front edge: The concern is a visible hairline that looks too regular in photographs. Use finer groupings along the edge, then blend towards thicker existing hair. The aim is a less abrupt transition. Assess the outline at close range and from conversational distance, since each view reveals different details.
Example, a broader thinning area: The concern is reduced coverage behind the hairline. Distribute appropriate follicle groupings through the area rather than placing every unit in evenly spaced rows. The aim is coverage that works with the surrounding hair. Compare how the area looks when the hair is parted and when it falls naturally.
Naturalness also depends on how placement relates to existing hair. Assess a transplant beside the person’s own texture, direction and density, not as an isolated patch. For example, a coarse curl pattern beside finer transplanted hair may look different from a result viewed only straight on. Review the transition from several angles and under ordinary indoor lighting.
Facial proportions provide another useful reference. A hairline that suits one face may not suit another, even if both examples show similar coverage. Compare the planned outline with the person’s forehead, temples and existing hair. A balanced design considers those features together, rather than copying a straight edge from a photograph.
Use this practical review sequence when looking at results:
Inspect the hairline: Look for a gradual edge, not a sharply defined row.
Check follicle groupings: Notice whether one-, two-, three- and four-hair groupings appear appropriately blended.
Follow the surrounding texture: Compare the transplanted area with existing hair nearby.
Change the view: Assess the result from the front, side and above.
Consider everyday styling: Look at whether the coverage appears coherent with hair parted or brushed naturally.
For a professional image, small details can influence whether a result looks integrated: the hairline transition, the distribution of follicle groupings and the match with existing texture. The clearest takeaway is to judge the overall pattern, not density alone. A close-up may show placement, while a wider view shows whether the result suits the face and surrounding hair.
DHI South Africa: Direct Hair Implantation (DHI)
DHI South Africa offers Direct Hair Implantation (DHI) for people exploring hair restoration after reviewing hairline design, growth timelines and scarring. A discussion can help you understand how the approach relates to your hair-loss pattern and desired appearance, including whether transplantation is relevant to your priorities.
Surgery isn’t the only route to consider. DHI South Africa also offers GFC Treatment, Regenera Activa and PRP Hair Loss Treatment. These options provide different approaches to addressing hair loss, so the right conversation starts with your concerns and what you hope to achieve.
If you’re weighing your next step, you’re welcome to contact DHI South Africa to discuss your hair restoration questions.
Make your next step a considered one
Choosing a hair transplant for professional-image reasons is personal, shaped by how you want to look and feel in everyday settings. Consider what matters most to you, such as a subtle change, a particular style or a broader approach to hair restoration. Clear priorities can make a discussion about your goals more useful.
If you’re exploring a hair transplant for professional image concerns, you don’t need every detail decided beforehand. A considered conversation can help you explain what you hope to change, understand the approach being discussed and decide whether it feels right for you. Take the time you need to make an informed choice.
Your professional image is part of your own story. Let your next step reflect the result you hope to achieve, at a pace that feels comfortable for you.
Frequently Asked Questions
How can a hair transplant affect professional appearance and confidence?
A hair transplant can change how hair frames your face, which may influence how you feel about your appearance at work. Some people hope that a fuller-looking hairline will make them feel more comfortable in meetings, photographs or video calls. Confidence is personal, though, and a procedure cannot guarantee a particular emotional response. Identify the specific change you want, such as softening a receding hairline or improving coverage.
What hair transplant methods are available, such as FUE and FUT?
FUE and FUT describe different ways of harvesting follicles: FUE removes them individually, while FUT removes a strip of scalp. Direct Hair Implantation (DHI) describes an implantation technique. DHI South Africa offers DHI, using FUE for extraction and its patented DHI Implanter Tool for placement. These terms describe different stages or approaches, so compare what each involves and how the proposed plan addresses your hair-loss pattern, rather than treating the names as interchangeable.
How long does hair transplant recovery take, and when are results visible?
Recovery and visible growth are separate parts of the process. Transplanted hairs can shed while their roots remain, and new hair typically takes 12-18 months to grow to a normal length. This means early appearance is not the same as the later result. For practical planning, distinguish the time needed to recover from the longer period in which hair growth develops, and follow the care instructions provided for your procedure.
Can a hair transplant look natural in a professional setting?
Yes, a transplant can look natural in professional settings when its design suits your features and existing hair. Consider how it appears not only in a still photograph, but also during ordinary movement, under office lighting and on video calls. For example, a hairline that blends with neighbouring hair may look more integrated than a sharply defined edge. Review different angles and discuss the appearance you want before deciding on a plan.


Comments